Jack
From Rivendell Wiki
Configure Rivendell 3 For Use With Jack
In 2020, Rivendell processes and Jack processes must be run as the same user ID. And since Rivendell processes (in the packaged version available from Paravel Systems) always run as root, this means Jack must also run as root.
Do this using the per-host configuration in RDAdmin->Manage Hosts.
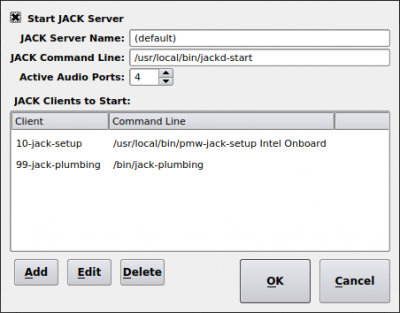
With the host configuration open, touch the JACK Settings button to manage the Jack settings.
Ensure that Rivendell starts the JACK app by checking the Start JACK Server checkbox. Leave the JACK Server Name set to (default). It is easiest to set the JACK Command Line to the full path of a shell script so you can make changes to the way in which the JACK app is started. Here is an example JACK startup script:
#!/bin/sh

#######################################################################
##
## This script is started by Rivendell caed when the Rivendell daemons
## are launched. The script assumes a "default" Rivendell installation
## with the username 'rd' automatically logged in and running the
## windowing system.
##
## Change the JACK sample rate to match your Rivendell sample rate
## set in RDAdmin->System Settings.
##
#######################################################################

export LANG=en_US.UTF-8
export TERM=xterm
export QTDIR=/usr/lib64/qt4
export PATH=/sbin:/bin:/usr/bin:/usr/sbin:/usr/local/sbin:/usr/local/bin:/home/rd/bin
export XDG_DATA_DIRS=/usr/local/share/:/usr/share/
export XDG_RUNTIME_DIR=/run/user/1000
export QT_GRAPHICSSYSTEM_CHECKED=1

exec /usr/bin/jackd --name default -d dummy -r 48000 2>&1 > /var/tmp/jackd.log
Copy the above text and save it in a file named /usr/local/bin/jackd-start. Make the file executable with sudo chmod +x /usr/local/bin/jackd-start. Enter the full path of the shell script into the JACK Command Line text box.
When using the above script, notice that we initialize JACK with a “dummy“ device. We do this because the default device name is always “system”. Not only is this a useless name, it is also not something one can change without editing the JACK source code. In the script, we assign the “dummy” device to the “system” JACK client in order to “get it out of the way”.
Now you need to start some JACK clients. Do this by adding each one in the JACK Clients to Start section.
You may want to use the pmw-jack-setup script (or something like it) to configure your ALSA sound devices to work with JACK. This script accepts two parameters: the name of the ALSA device to configure, and the “human-readable” name of the JACK client. You can learn your ALSA device names by running the command sudo aplay -l (or su - root -c 'aplay -l') in a terminal window. Running this command results in output like:
**** List of PLAYBACK Hardware Devices ****
card 0: Intel [HDA Intel], device 0: CX20561 Analog [CX20561 Analog]
  Subdevices: 0/1
  Subdevice #0: subdevice #0
card 0: Intel [HDA Intel], device 1: CX20561 Digital [CX20561 Digital]
  Subdevices: 1/1
  Subdevice #0: subdevice #0
In the above output, the device name for card 0 is Intel. Many people prefer more appropriate names for their JACK devices. One common name for the built-in sound device (the “sound card” on the PC‘s motherboard) is “Onboard”. Set up your first JACK Client in RDAdmin as follows:
- touch Add
- enter a meaningful description in the Description text box
- enter the path and parameters to the setup script: /usr/local/bin/pmw-jack-setup Intel Onboard in the Command Line text box
- touch OK to save your settings
Repeat the above steps for as many ALSA-compatible hardware audio devices as you want to use with Rivendell. Note that pmw-jack-setup merely configures your hardware audio devices for use with JACK. It does not connect them to Rivendell.
Once you have successfully configured Rivendell to launch JACK and configure your audio devices, you need to “connect” the devices to Rivendell. There are several ways to do this, including:
The most reliable methods for making JACK connections are those that perform the work automatically and in the background. Unfortunately, CentOS does not package the jack-plumbing command, so one must either download the source code from the Debian website: here or here and compile it (the original source code for jack-plumbing seems to have been lost in the bit bucket), or choose a different “plumbing” tool to manage the JACK connections.
Note that in mid 2020 the pipewire audio subsystem is maturing and aims to be compatible with and to eventually replace both the pulseaudio and the JACK audio systems. Pipewire may include more “plumbing” tools over the long run.
