Difference between revisions of "Log Creation"
From Rivendell Wiki
(Created page with "= Overview = Rivendell has a built in scheduling system but you can also interface it to external music and traffic systems (for scheduling advertisements, jingles, ids, etc.)...") |
(No difference)
|
Revision as of 10:21, 13 March 2018
Contents
Overview
Rivendell has a built in scheduling system but you can also interface it to external music and traffic systems (for scheduling advertisements, jingles, ids, etc.).
You need to do some setup in RDAdmin for the Service you will be using. Then it is a matter of creating:
Events - Are a single item in the log. Could be a song that is picked using criteria you specify, static audio,macros, etc. This can also be place holders for events from the music scheduling software, notes, voice-track markers, etc.
Clocks - Clocks represent one hours time in your broadcast. You can have as many or as few clocks as you need. If you have broadcast hours where the format is exactly the same you can use the same clock for all hours that are the same. You fill clocks with Events.
Filling the Grid - A Grid represents one week of a Service's broadcast time. You fill the grid with Clocks.
From this you can produce logs. This all happens in RDLogManager
Tutorial
This tutorial will help you create your first log but does not cover all the options that you might encounter along the way. I'll cover just the basics and let you experiment with the other options. I will assume that you have songs, stations IDs, and liners/jingles in your audio library. I'll try to include alternate directions for those using external schedulers), and are a 24/7 music station.
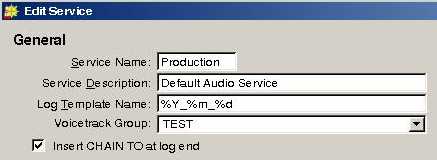
If you have not already configured the Log creation parameters in RDAdmin, please do so now:
log in to rdadmin
click "Manage Services"
select your service and click "Edit"
in the "Log Template Name" blank, enter %Y_%m_%d
check the "Insert CHAIN TO at log end" box
save settings and close rdadmin
Log Creation occurs within RDLogManager so start RDLogManager to begin this tutorial.
Events
The building blocks of log creation are Events. An event could be anything from playing a station ID to importing traffic or music from external logs to switching ports on your audio switcher. There are several options on this screen but I'll keep things simple.
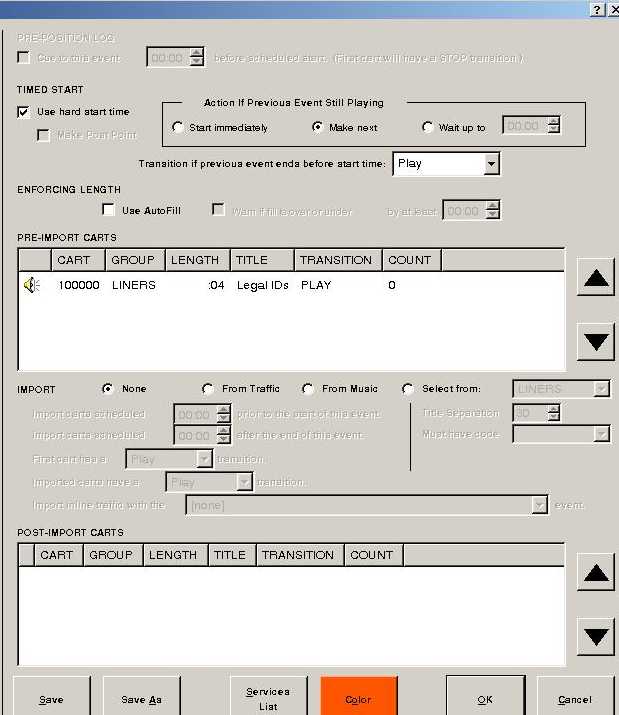
Lets create a station ID event. Click "Edit Events" then "Add" and type in "ID" or whatever you like. Find your ID cart in the left panel and drag it into the "Pre-Imported Carts" area. You probably want your ID to start close to the time you schedule it so check "Use hard start time" and "Make Next." Transition should be "PLAY." Lastly, choose a unique "Color" via the bottom button and click "OK" to save.
Follow the same steps to create a Liner event but instead choose the Liner cart.
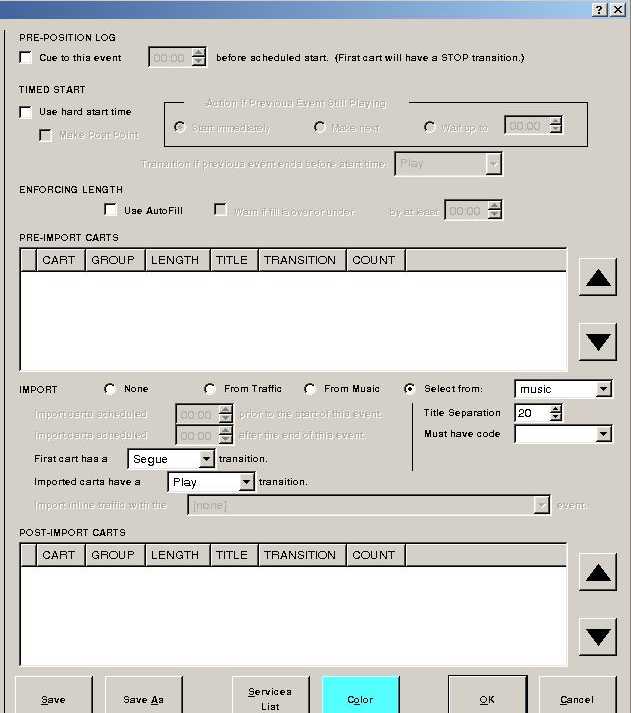
Finally, we need to create an event to schedule a song. Again, create a new event. On the "Import" line
choose "Select From"
select your music group from the drop down box
adjust Title separation to suite your needs but don't set it too high
change First Cart transition to "Segue"
NOTE: If you are using an external Music Scheduler, your "Music" event will instead be set to import "from music."
Clocks
A clock is a series of "Events" that occur during an hour. You will need to create one clock for each unique hour. For example, if you are a music station and play music 24/7 with each hour being EXACTLY the same then you will only need one clock. If you play different styles of music during certain hours (and don't use an external music scheduler), you need a separate clock for those hours. If you air programs, you will probably need a separate clock for each hour.
We will create just one clock to keep things simple but you will be able to easily create additional clocks to meet your needs.
First, click "Edit Clocks" from the RDLogManager opening screen and then "Add" and name your new clock something like "Music." You will now see a blank clock. Each clock must have a unique 3 alpha-numeric code so type in something like "MU1" (i.e. Music 1) in the "Code" field near the top.
Click the "Add" button to start adding "Events" which you created during the previous step. Click "Select," choose your "ID" event, and click "OK." Start time should be 00:00 (MM:SS) and end time should be the approximate length of your ID cart. My stop time is 00:10 for a ten second ID. Click OK. You should now see your ID on the clock to the right and in the list on the left. Notice the color is the one you chose when creating the event.
Now we want to schedule some songs. We'll have 3 songs then a liner and continue that pattern until we fill the entire clock (hour). To add a song, we:
click "Add"
click "Select"
choose "Music" event
click "OK"
adjust "Start" and "Stop" times (I use 00:10 and 03:00 respectively)
In my case, I'm figuring the songs in my library have an average length of 3 minutes. Actually, the average is higher then that but I want a margin of safety so I will always have at least 60 minutes worth of programming (i.e. overfill the hour). It's best to make a conservative estimate at first then tweak the settings later.
Now add a second "Music" event with a start time of 03:00 and a stop time of 06:00. Next a third "Music" event with a start time of 06:00 and a stop time of 09:00.
We've completed our 3 songs and it's time for a "Liner" event. Add the "Liner" event with a start time of 09:00 and a stop time of 09:10 (for a ten second liner). The next "Music" event well be from 09:10 to 12:00.
Continue repeating those steps until the clock (hour) is filled from 00:00 to 59:59.
Use the "Color" button to assign a unique color to your "Music" clock. You can also click the "Scheduler Rules" button and adjust the Artist separation edit other Music Scheduler rules. Finally, click "OK" to save your new clock.
Congratulations! You are almost done.
NOTE: If you are using an external Music Scheduler, your "Music" event will span the entire sweep (i.e. 00:10 to 09:00) so that all songs in your music log appearing during that time frame will be imported. You will have to adjust the time frame so the clocks in Rivendell mesh with those in your Music Scheduler.
Grids
Click "Edit Grids" from the RDLogManager opening screen and then choose your service (there may only be one). You will see buttons representing each hour of every day. The "Grids" allow you to choose which "Clock" is used for every hour of the week. In our case, we will set each hour to use our "Music" clock we created in the previous step.
This step is simple. Click each button in sequence and select your "Music" clock from the list and click "OK." You will notice that the color of the Grid button will change to reflect the color of your Clock and the 3 character Clock Code will appear. Make sure you assign a Clock to every hour. Click "Close" when done.
Generating Logs
You are now ready to generate a log. Click "Generate Logs" from the RDLogManager opening screen. Adjust the date as required and click "Create New Log." That's it!
You can view and edit the log in RDLogEdit. To play the log, load it in RDAirPlay.
Loading Next Day's Log
In rdadmin you can get a generated log to load the next day at midnight. Manage Services > Edit Service Name > and put a tick in "Insert Chain At Log End" box. If the next day's log fails to load, check to see that the IP address entered in that machine’s Host configuration in RDAdmin is correct.
Final Notes
You will notice that building logs is a modular process. Logs are made of Grids which are made of Clocks which are made of Events. This means that you can edit an Event once even though it may appear many, many times in the log. For instance, you can change the Liner Event to use a different cart without editing Clocks or Grids. Once your Events and Clocks are setup, creating Grids and Logs should be easy.
Other Usefull Wiki pages
Importing External Logs into Rivendell
Creating Logs from the command line and from RDCatch
How to setup a rotation of fill in logs that can be loaded via a macro


